
Azure accounts and how to add/modify Azure administrator accounts
Enterprise Admin
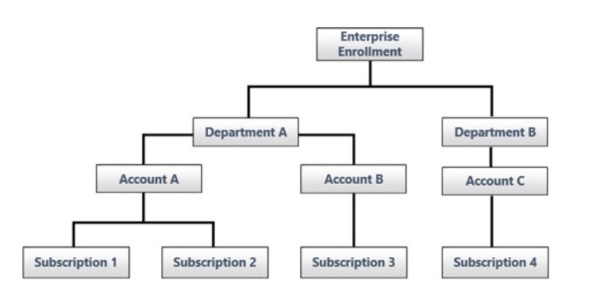
- Root user of EA
- Enterprise admin can create departments and assign department admins
- EA admin can view consumption usage, billing charges across all departments, accounts and subscriptions
- Ability to add or associate accounts to enrollment
- Can view usage data across all accounts
- Can view monitory commitment balance associated to enrollment
- No limit on the number of enterprise administrators on an enrollment
- There can be multiple EA administrators, including read-only administrators
How to add/change EA administrator
- Login to ea.azure.com/enrollment details tab/add-modify administrator accounts
Department Admin
- Can edit details on department like cost center and create EA accounts under department
- EA admin can assign department admin permissions to view billing charges
- There can be multiple department administrators, including read-only administrators
How to add/change department administrator
- Login to ea.azure.com/department tab/add-modify department administrator
Account owner
- Adds credit card info to subscription and change/update credit card info when it expires
- Can create subscriptions and assign service admin for that subscription
- Does not have root level access to resources in subscription
- Can replace service admin and can also put himself as service admin if needed
- Account admin can be granted by EA admin to view billing charges at account level.
- Without this permission account admin see data usage but not how much money it costs.
- In an EA enrollment environment, EA account owner creates a subscription, hence by default has two roles-EA account owner and subscription account owner.
- Account owner by default will not have visibility to monetary commitment balance unless they also have enterprise administrator rights
- Enterprise administrator can assign account owner rights to view the monetary commitment
- There can be only one account owner for an account
How to add account owner
- You add account owner when creating account.
- Login to ea.azure.com/account tab/add account/add email address of account owner.
How to modify account owner
- Login to ea.azure.com/account tab/select existing account/hover mouse to the right end and you see an icon to change account owner.
Service admin
- Root user at subscription level but does not have access to billing information
- One service administrator per subscription
- Cannot perform any actions on EA portal
- Can replace himself/herself as service admin
- Can add co-admins to a subscription
- Multiple co-administrators can be added per subscription
- Co-admins have all powers as service admins but cannot replace original service admin
- Service administrators and co-administrators, use manage.windowsazure.com to work on the subscription and resources
How to change service administrator
- You assign service administrator when you create subscription.
- To change service administrator, login to account.windowsazure.com/click on account tab on the top/click on any existing subscription/click on edit subscription details/type new name and/or service administrator email address
How to add/modify co-administrator
- To add/modify co-administrators, login to manage.windowsazure.com/settings/administrators/add or edit buttons at the bottom of the page.
